Leave Module
To activate the Leave Module go to "Setup Defaults"

Then select "Options"

On the Optional Functions screen ensure that the "Use leave accrual system" box is checked (ticked).
The following steps must then be taken;
- Set the Company Leave Defaults - these are the days allowed per leave category.
- Set the Leave "Take On Date" - the date from which the system will commence calculating leave accruals.
- Enter each staff member's accrued leave as at the Take On Date.
Select "Setup Defaults" again then from the "System Defaults Menu" select "Leave Defaults"

Step 1 - Enter the leave default days

Users may elect to offer their staff members better leave benefits than those regulated but they cannot have less.
Either accept the days as regulated or enter your own (better) benefit days per leave category.
Step 2 - enter the Leave Take On Date
When using a new system for the first time it must be accepted that existing staff will have accumulated leave due to them of which the new system will have no record. To overcome this ioClock provides for the input of a “Leave Take On Date” as seen on the Leave Defaults setup screen below;
ioClock will only calculate new leave accrued (in the current leave cycle or a new cycle) as from this date.
Users must then first do a Take-On of existing leave balances before the Leave System becomes active.
Step 3 - Enter each staff member's accrued leave days as at thye Take On Date
Select "Staff" from the main menu

Select a staff member from the Staff Browse List, then click on the "Employee Leave Record" tab, the following screen will appear;
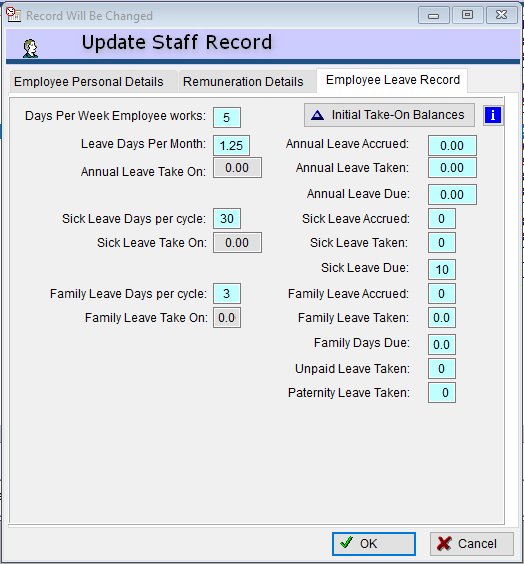
Click on the "Initial Take-On Balances" button - the system will then permit you to enter the accrued leave days for;
- Annual Leave
- Sick Leave
- Family Leave
NOTE: Individual staff take on details for leave can only be done once and cannot be amended once the "OK" button has been clicked.